Deploy on Celo with Truffle
How to deploy a smart contract to Celo testnet, mainnet, or a local network using Truffle.
Truffle is a world-class development environment, testing framework, and asset pipeline for blockchains using the Ethereum Virtual Machine (EVM). By creating a Truffle project and editing a few configuration settings you can easily deploy your project on Celo.
tip
To learn more about the features available to you as a smart contract developer with Truffle, visit the Truffle documentation.
Prerequisites#
To deploy on Celo using Truffle, you should have Celo set up Celo in your local environment. If you prefer to deploy without a local environment, you can deploy using Remix or Replit.
If you are new to Truffle, complete the Celo truffle installation instructions and complete their Quickstart Tutorial to get more familiar with this tool.
Project Setup#
Setup Project Folder
Open your terminal window, create a project directory, and navigate into that directory.
mkdir myDapp && cd myDapInstall hdwallet-provider
From your root truffle project directory, install truffle/hdwallet-provider. This allows you to sign transactions for addresses derived from a mnemonic. You’ll use this to connect to Celo in your truffle configuration file.
npm install @truffle/hdwallet-provider --saveInitialize Truffle
Initializing truffle creates the scaffolding for your truffle project.
truffle initOpen Project
Open your project in Visual Studio code or your preferred IDE.
code .tip
You can launch VS Code from the command line by installing it in your shell path.
Write Project Code#
Create Smart Contract
Create a file named HelloCelo.sol in the contracts directory and populate it with the Solidity code below.
// SPDX-License-Identifier: MITpragma solidity ^0.8.3;
contract HelloWorld { string public greet = "Hello Celo!";}tip
If you would like to create a different smart contract or learn more about Solidity (the language for developing smart contracts) you can view the Solidity docs and Solidity by Example.
Migrations File
Create a file named 2_deploy_contracts.js in the ./migrations/ folder and populate it with the code below.
var HelloCelo = artifacts.require('HelloCelo')
module.exports = function (deployer) { deployer.deploy(HelloCelo)}tip
If you created a different smart contract, update the variable name, file requirement, and deployment accordingly to match your new contract.
Mnemonic .env
If you don’t yet have a mnemonic or are unsure how to create one, see Set up a Development Wallet for more details. When you’re ready, create a .env file in your root directory and populate it with your development wallet mnemonic (example below).
MNEMONIC="turtle cash neutral drift brisk young swallow raw payment drill mail wear penalty vibrant entire adjust near chapter mistake size angry planet slam demand"This mnemonic is used by HDWalletProvider in the truffle.config file to verify the account supplying funds during contract deployment. (See lines 21 & 69.)
Create .gitignore file
It is important to hide your mnemonic and other important files while developing Celo applications. When using Git or GitHub, you can populate a .gitignore file with the code below to ensure you don’t accidentally publish these files.
Create a .gitignore file in your root directory and populate it with the code below.
# dependencies/node_modules
# Mac users.DS_Store
#hidden files.envtip
See ignoring files for more information.
Configure Deployment Settings#
The default truffle.config.js file contains connections required to deploy to the Ethereum networks, imports HDWalletProvider, and connects to the mnemonic in your .env file. To deploy a Celo network, you need to update this configuration file to point toward the different Celo networks and add a few details specific to Celo best practices.
You can see an example repo here.
Update the truffle-config.js file
Open truffle-config.js in a text editor and replace its contents with this Celo configuration code. This code is similar to Truffle settings with a few configuration updates needed to deploy to a Celo network.
Connect to a Development Network
Using Celo Ganache CLI creates test accounts at the localhost on port 7545. The private network setup connects to your localhost on this port and gives you access to your accounts on ganache-cli.
local: { host: "127.0.0.1", port: 7545, network_id: "*"}tip
If you choose to Set up a Local Development Chain, your blockchain will also be running on a private development network on localhost. This same configuration can be used to connect to the local development chain.
Connect to Testnet using Forno
Using Forno allows you to connect to the Celo test blockchain without running a local node. The testnet configuration uses Forno to connect you to the Celo Testnet (Alfajores) using HDWalletProvider and the mnemonic stored in your .env file.
testnet: { provider: function() { return new HDWalletProvider(process.env.MNEMONIC, "https://alfajores-forno.celo-testnet.org") }, network_id: 44787, gas: 20000000 }Connect to Mainnet using Forno
Using Forno also allows you to connect to the Celo main blockchain without running a local node. The mainnet configuration uses Forno to connect you to the Celo Mainnet using HDWalletProvider and the mnemonic stored in your .env file.
mainnet: { provider: function() { return new HDWalletProvider(process.env.MNEMONIC, "https://forno.celo.org") }, network_id: 42220, gas: 4000000 }tip
Forno is a cLabs hosted node service for interacting with the Celo network. This allows you to connect to the Celo Blockchain without having to run your own node.
Deploy Smart Contract#
Compile and Migrate#
Compile Contract
Compile the Solidity code into Ethereum bytecode prior to deploying the contract. The following truffle command will compile any new or updated Solidity (.sol) contracts found in ./contracts.
truffle compiletip
Learn more about compiling contracts with Truffle here.
Migrate Contract
Migrations are JavaScript files that help you deploy contracts to the Ethereum network. To run your migrations, run the following:
truffle migratetip
Learn more about Truffle migrations here.
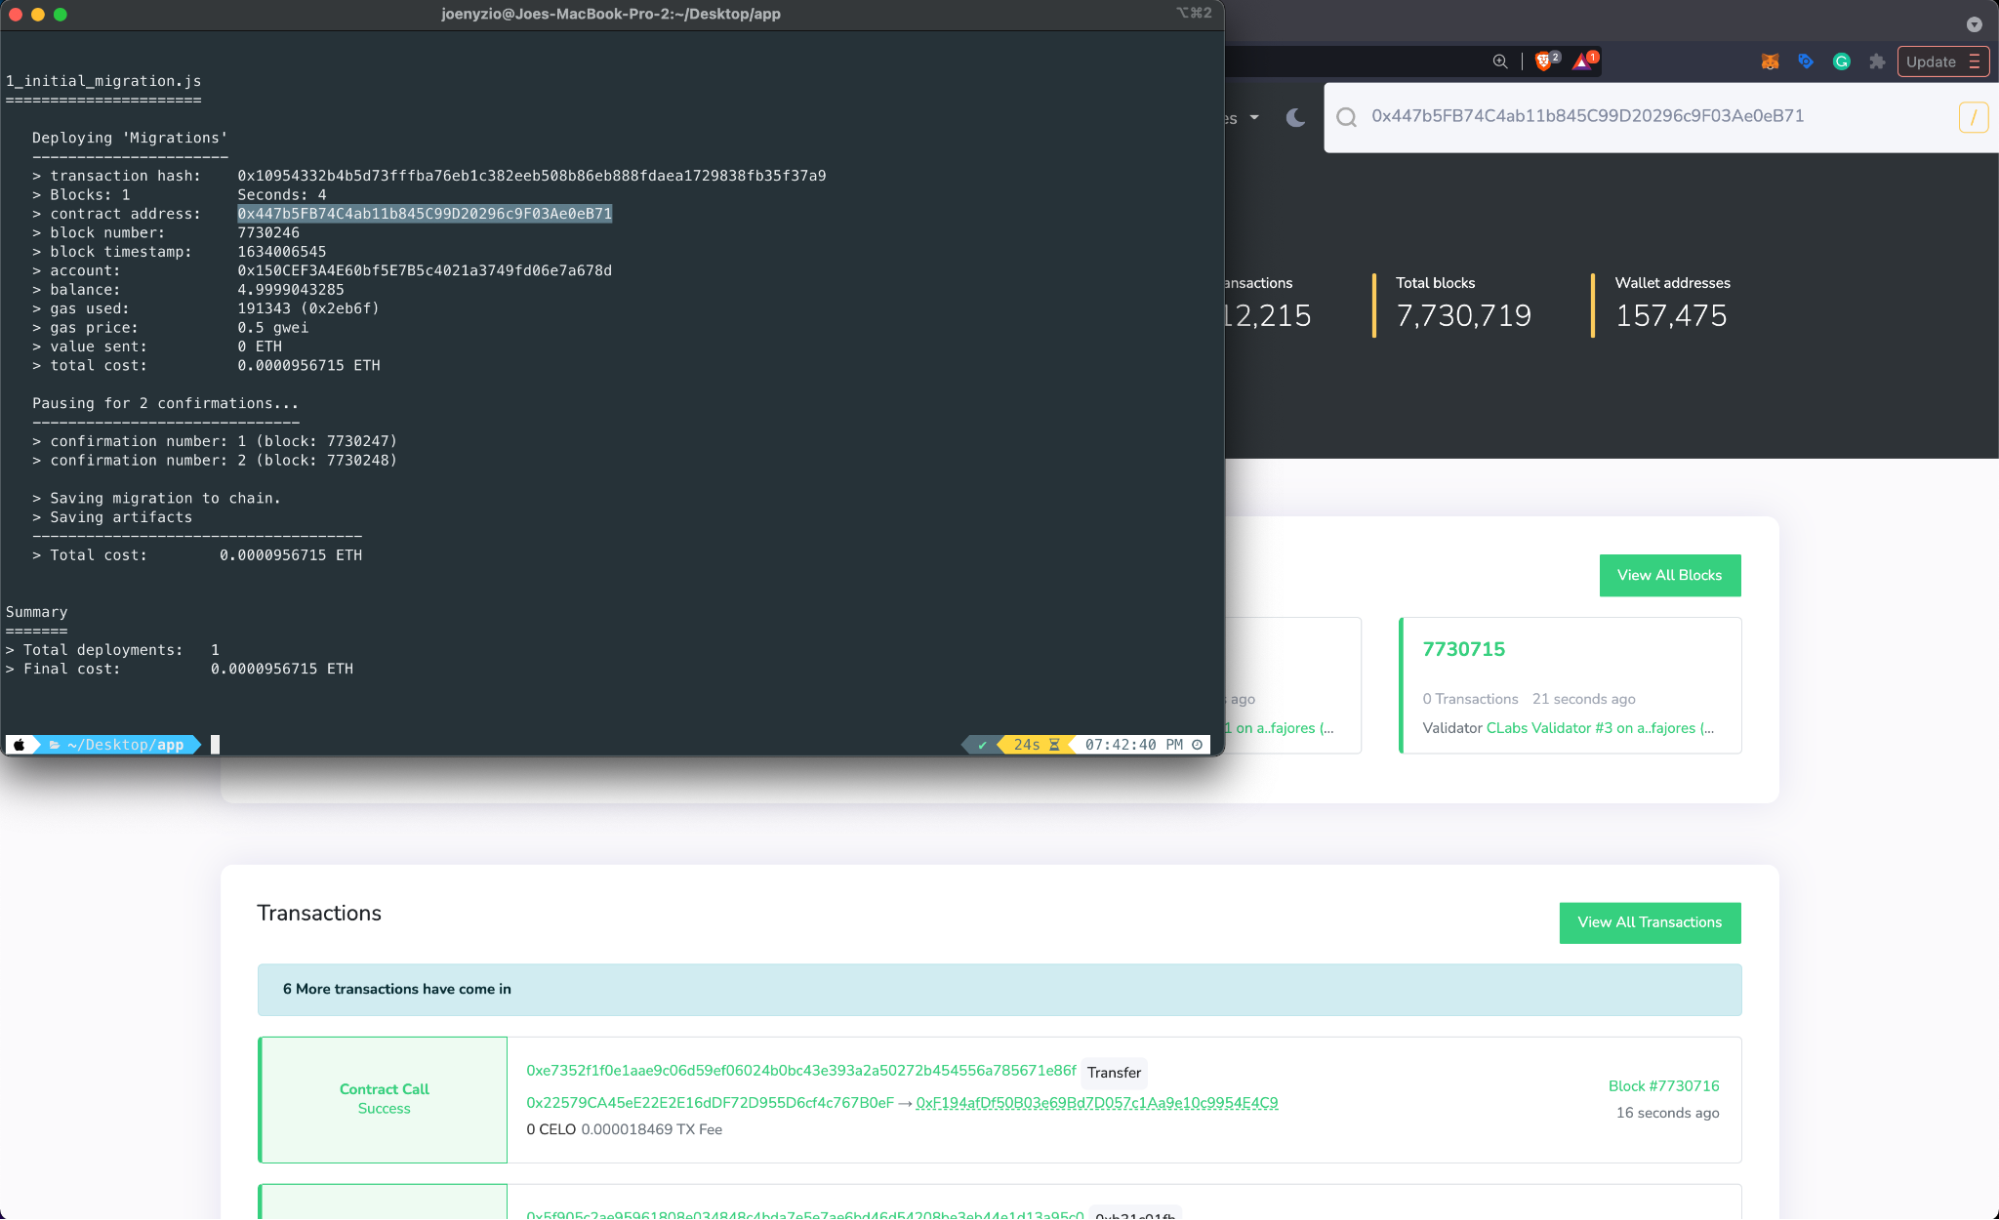
Deploy Contract#
Deploy to your chosen Celo network running one of the following commands.
truffle deploy --network alfajorestruffle deploy --network celotruffle deploy --network localDeploy with --reset#
Use the ---reset flag to redeploy contracts with a new contract address if you haven't made any code changes.
truffle deploy --network NETWORK --resettruffle migrate --network NETWORK --resettip
Save contract addresses for future reference. If you lose it, proceed to block explorer to review your wallet transactions for contract creation and its response. Truffle saves deployment information, like transaction hashes and contract addresses, in JSON files in ./build/contracts/.
View Contract Deployment#
Copy your contract address from the terminal and navigate to the block explorer to search for your deployed contract. Switch between networks to find your contract using the dropdown by the search bar.
View Deployed Contract
Navigate to BlockScout and select the network of your deployed contract.
- Paste your contract address from the terminal window and search for it in BlockExplorer.
tip
Learn more about exploring the Celo network and smart contract details in BlockScout here.
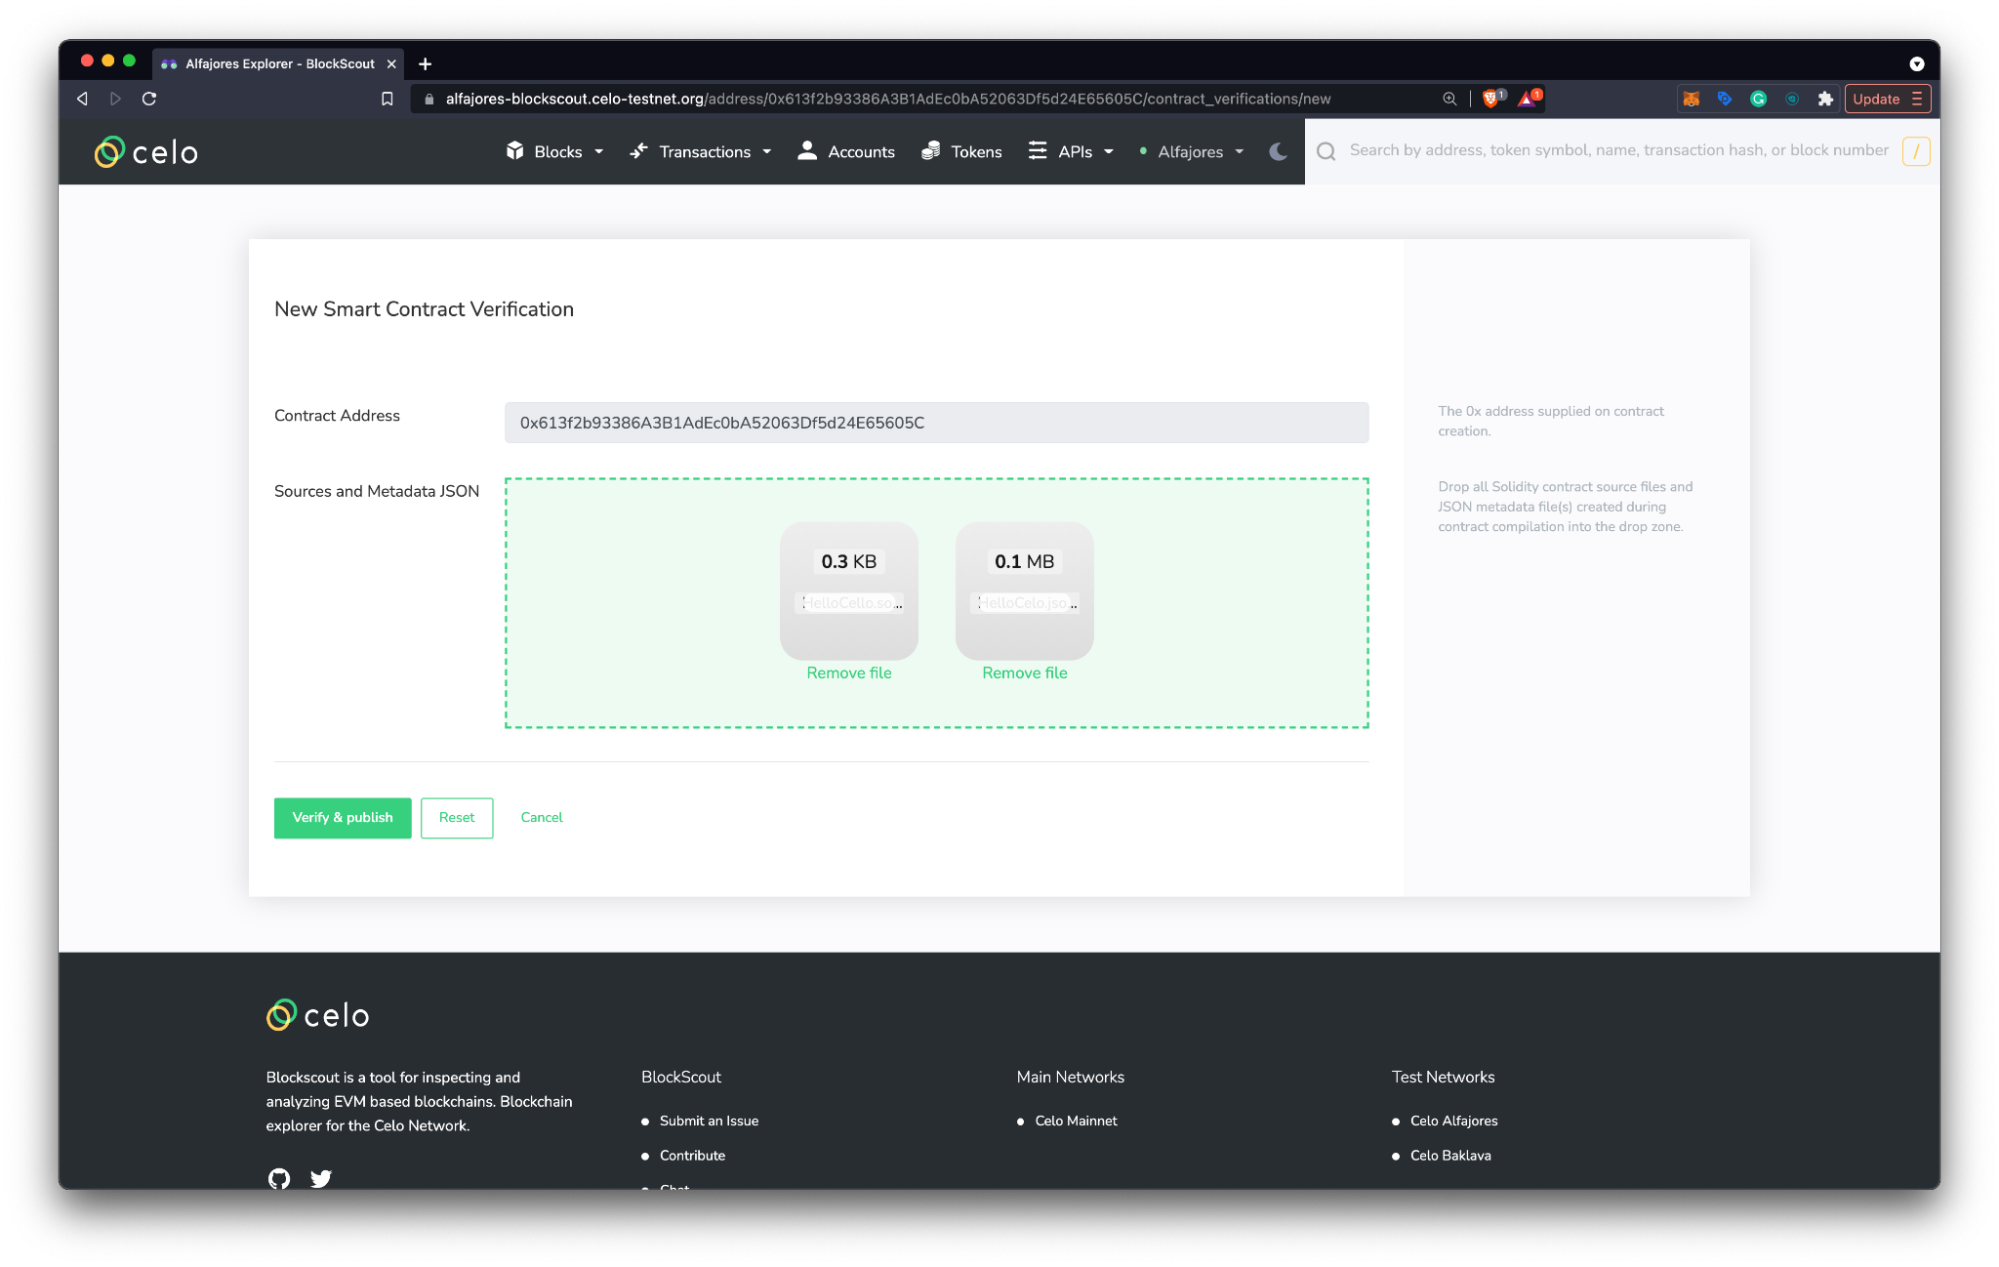
Verify Smart Contract#
Verifying a smart contract allows developers to review your code from within the Celo Block Explorer.
- Navigate to the Code tab at the Explorer page for your contract's address
- Click Verify & Publish to enter the smart contract verification page
- Upload your smart contract (example: HelloCelo.sol) and it’s .json file (example: HelloCelo.json) found in build > contracts folder.

- Click Verify & Publish
- Navigate to the Contract Address Details Page in the block explore to, use the Code, Read Contract, and Write Contract panels to view and interact with your deployed smart contract.